🔗 Affiliate Disclosure: As an Amazon Associate, Tech Rig Review earns from qualifying purchases. Links on this page may be affiliate links — at no extra cost to you.
If you spend more than a couple of hours a day hunched over a laptop, you already know the feeling: tight shoulders, a stiff neck, and eyes that ache by mid-afternoon. A laptop stand is one of the cheapest, simplest fixes for all of this — but only if you set it up and use it correctly. Just propping your laptop on a random box or book isn’t the same thing, and it can actually make your posture worse instead of better.
In this guide, you’ll learn exactly how to use a laptop stand step by step, how to pick the right height and angle for your body, which type of stand suits your work style, and the small mistakes that quietly ruin your ergonomics. By the end, you’ll be able to set up a laptop stand like a professional ergonomics consultant would — no guesswork required.
Table of Contents
Why a Laptop Stand Matters More Than You Think
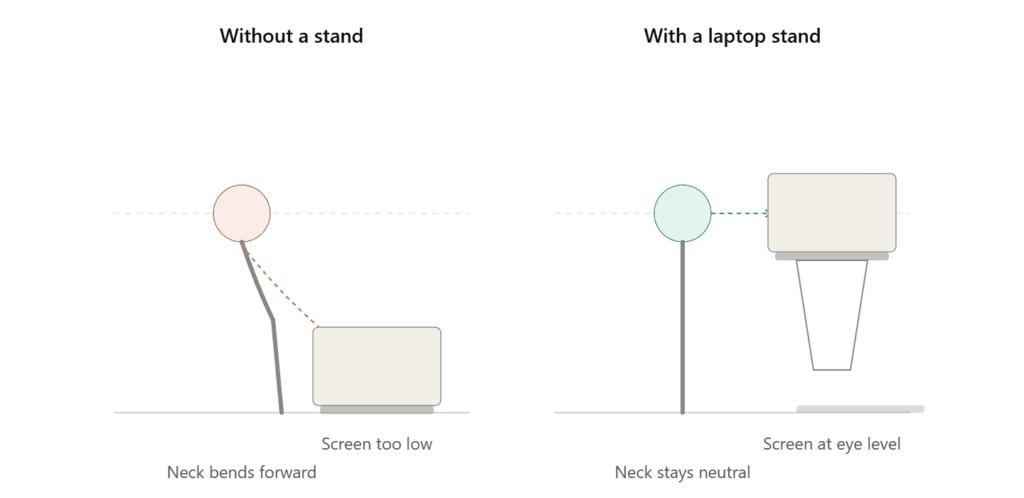
Laptops were never designed with ergonomics in mind. The screen and keyboard are fused, which forces you into one of two bad positions:
- Raise the screen to eye level, and your wrists sit too high for comfortable typing.
- Keep the keyboard at a comfortable typing height, and you’re forced to look down, straining your neck.
This trade-off is called the “laptop ergonomics problem,” and it’s a major contributor to what physiotherapists now call “tech neck” — a forward-leaning posture that puts extra strain on the cervical spine. Research on posture has repeatedly shown that looking down at a screen for extended periods increases the effective load on the neck muscles, sometimes by several times the actual weight of the head.
A laptop stand solves this by separating the screen height from the keyboard height. You raise the display to eye level using the stand, then use a separate external keyboard and mouse for typing. This single change is one of the most effective, low-cost ergonomic upgrades you can make to a home or office desk setup.
What You’ll Need Before You Start
Before we get into the step-by-step setup, gather these items:
- A laptop stand (adjustable height and angle if possible)
- An external keyboard (wired or wireless)
- An external mouse
- A desk with enough depth to accommodate the stand and peripherals
- A chair with proper lumbar support (optional, but it pairs well with a laptop stand)
If you only use the stand without an external keyboard, you’ll raise your screen but still type at an awkward angle. The stand and the external keyboard work as a pair — using one without the other only solves half the problem.
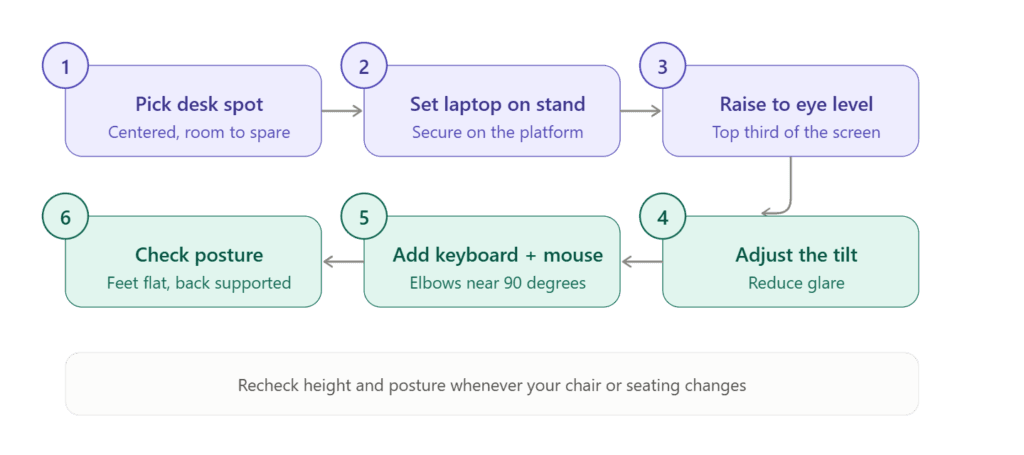
Step-by-Step: How to Use a Laptop Stand Correctly
Step 1: Choose the Right Spot on Your Desk
Place the stand directly in front of you, not off to one side. Your monitor (in this case, your laptop screen) should be centered with your body so you’re not twisting your neck sideways for long periods.
Leave enough space in front of the stand for your external keyboard and mouse. A good rule of thumb is at least 25–30 cm (10–12 inches) of desk space between the edge of the desk and the stand.
Step 2: Set the Laptop on the Stand
Open your laptop and place it on the stand’s platform, making sure the rubber grips or lip on the stand securely holds the base. Most stands have a slight lip or non-slip pad — check that your laptop isn’t at risk of sliding forward.
Step 3: Adjust the Height Until the Top of the Screen Is at Eye Level
This is the single most important step. Sit in your normal working posture, look straight ahead, and check where your eyes naturally land on the screen.
- The top third of the screen should be roughly at or just below eye level.
- Your neck should be neutral — not tilted up, not tilted down.
- If you wear bifocals, you may need the screen slightly lower to avoid tilting your head back.
Most adjustable stands let you change the height using a telescoping arm, folding legs, or stacked risers. Take the time to fine-tune this; even 2–3 cm can make a noticeable difference over an 8-hour workday.
Step 4: Adjust the Tilt Angle
Once the height is correct, adjust the tilt (if your stand supports it). A slight backward tilt of 10–20 degrees reduces glare from overhead lighting and keeps the screen perpendicular to your natural line of sight.
If your stand doesn’t tilt, angle it so the screen isn’t reflecting window light or ceiling lights directly into your eyes.
Step 5: Connect Your External Keyboard and Mouse
Place your external keyboard directly in front of you, centered with your shoulders. Your mouse should sit right next to the keyboard at the same height.
Correct hand position:
- Elbows bent at roughly 90 degrees
- Wrists straight, not bent up or down
- Shoulders relaxed, not hunched toward your ears
If typing feels like a reach, move your chair closer or lower the desk/keyboard height rather than reaching forward.
Step 6: Check Your Sitting Posture
With the stand and keyboard in place, run through this quick posture checklist:
- Feet flat on the floor or a footrest
- Knees roughly level with or slightly below your hips
- Lower back supported by the chair’s lumbar curve
- Shoulders relaxed and down, not raised
- Head balanced over your spine, not pushed forward
Step 7: Take Regular Micro-Breaks
Even with perfect ergonomics, staying static for hours isn’t healthy. Use the classic 20-20-20 rule: every 20 minutes, look at something 20 feet away for 20 seconds. Stand up and stretch every 45–60 minutes.
How to Use a Laptop Stand for Different Work Styles
For Desk-Based Office Work
Use a fixed or adjustable stand paired with a full external keyboard and mouse setup, as described above. This is the ideal configuration for anyone working 6+ hours a day at a laptop.
For Video Calls and Presentations
Raise the laptop so the webcam sits at eye level. This alone dramatically improves how you appear on video calls — instead of a “looking down” angle that emphasizes your chin and ceiling, the camera captures a natural, direct angle that looks more professional and engaged.
For Laptop-Only Use Without an External Keyboard
If you’re traveling and don’t have an external keyboard, don’t raise the laptop to full eye level — you’ll end up typing with your arms lifted uncomfortably high. In this case, use a lower, moderate incline (just enough to improve airflow and slightly reduce neck angle) and take more frequent breaks to compensate.
For Standing Desks
If your stand is being used on a sit-stand desk, you’ll need to re-check the height every time you switch between sitting and standing. Many portable, foldable stands are lightweight enough to reposition quickly, which makes them a good match for standing desk setups.
For Gaming or Multi-Monitor Setups
Use the laptop stand primarily for cooling and as a secondary display, while your main monitor stays at the primary eye-level position. Angle the laptop screen slightly toward you so it’s still glanceable without becoming a neck-strain risk.
Choosing the Right Type of Laptop Stand
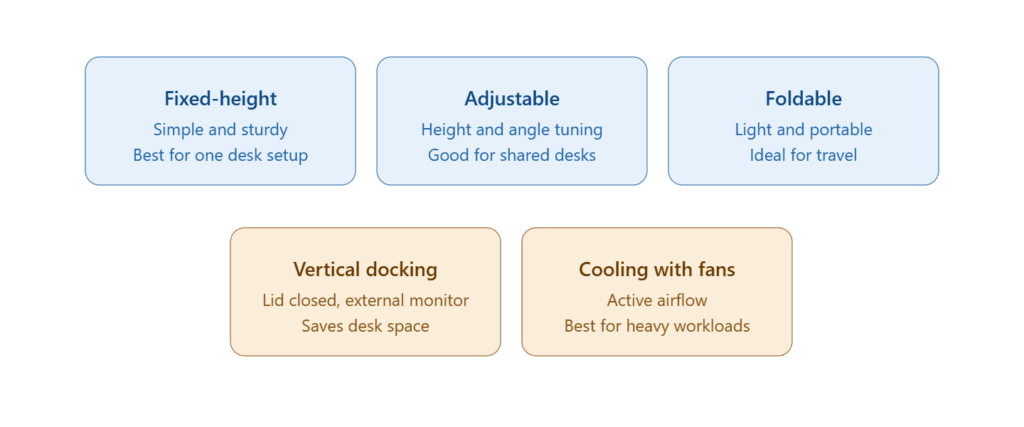
Not all stands work the same way, and the “best” one depends on your setup.
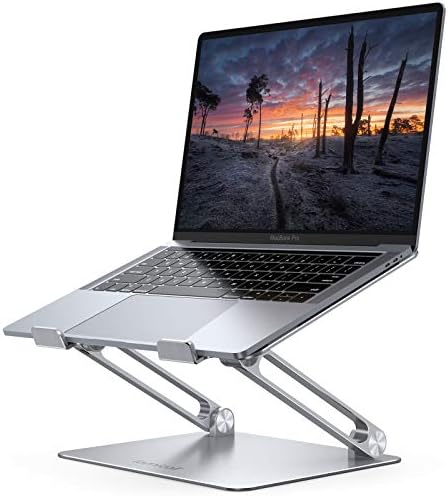


1. Fixed-Height Stands
Simple, sturdy, and usually the most affordable. Good if your desk height rarely changes and you already know the ideal elevation for your eye level.
2. Adjustable/Telescoping Stands
These let you fine-tune both height and angle, which is especially useful if you share a desk with someone else or switch between sitting and standing. Slightly more expensive but worth it for most people.
3. Foldable/Portable Stands
Lightweight, collapsible designs made for travel or hybrid work. They typically sacrifice some stability and height range in exchange for portability — great for cafes, co-working spaces, and commuting.
4. Vertical/Docking Stands
These hold the laptop upright, like a book on a shelf, and are meant to be used with the lid closed alongside an external monitor. Ideal for people who use a laptop purely as a “mini desktop” computer via a dock.
5. Cooling Stands with Fans
Built-in fans help pull heat away from the base of the laptop, which is especially useful for gaming laptops or heavy workloads like video editing and 3D rendering. If your laptop tends to throttle performance under heat, this type is worth the investment.
Common Mistakes People Make When Using a Laptop Stand
Mistake 1: Skipping the External Keyboard
This is the most common and most damaging mistake. Raising the screen without also raising and separating the keyboard means you’re typing with your wrists bent upward, which can contribute to wrist strain over time.
Mistake 2: Setting the Height Once and Never Adjusting It
Your ideal height can change depending on your shoes, chair height, or even the task you’re doing (typing versus reading). Get in the habit of doing a quick posture check whenever you sit down.
Mistake 3: Placing the Stand Too Far Away
If the stand pushes your screen too far back on the desk, you may lean forward to compensate, canceling out the posture benefits. Keep the screen at a comfortable reading distance — generally an arm’s length away.
Mistake 4: Ignoring Stability
A wobbly stand is worse than no stand at all, since it can make you unconsciously tense your muscles to compensate, and in the worst case, risks your laptop tipping over. Always check that the stand sits flat and doesn’t rock before trusting it with your laptop.
Mistake 5: Blocking Ventilation
Some stands look sleek but actually cover the laptop’s air vents. Check your laptop’s vent locations (usually on the bottom or back) and choose a stand design — like an open mesh or riser style — that keeps airflow unobstructed.
Mistake 6: Using It Without Adjusting Chair or Desk Height
A laptop stand is one part of a bigger ergonomic system. If your chair is too low or your desk is too high, no amount of stand adjustment will fully fix your posture. Treat the stand as one piece of the puzzle, not a standalone fix.
Laptop Stand vs. Books or DIY Risers: Does It Really Matter?
It’s tempting to stack a few books under your laptop instead of buying a stand, and in a pinch, this can work. However, dedicated stands offer a few real advantages:
- Precise, repeatable height adjustment instead of guessing with book thickness
- Better ventilation, since most stands elevate the laptop off the desk surface on all sides
- Stability, since stands are designed not to wobble or slide
- Portability, with folding designs that fit in a bag, unlike a stack of books
If you’re testing whether raising your screen actually helps before committing to a purchase, a temporary DIY riser is a reasonable way to trial the concept. But for daily, long-term use, a proper stand is safer for your laptop and more comfortable for your body.
How a Laptop Stand Helps with Laptop Cooling
Beyond ergonomics, a laptop stand plays a real role in thermal management. Laptops typically pull cool air in through vents on the bottom and sides, then exhaust hot air through the back or side. When a laptop sits flat on a desk — or worse, on a soft surface like a bed or your lap — those intake vents get partially blocked, causing the internal components to run hotter.
A stand elevates the chassis so air can circulate underneath, which:
- Reduces the chances of thermal throttling during demanding tasks
- Can modestly extend the lifespan of internal components by reducing sustained heat exposure
- Keeps fan noise lower, since the system doesn’t have to work as hard to dissipate heat
If you regularly run CPU or GPU-intensive tasks — video editing, coding with heavy compilers, or gaming — pairing a laptop stand with a cooling pad (a stand with built-in fans) offers a noticeable improvement in sustained performance.
Quick Setup Checklist
Use this as a fast reference the next time you sit down to work:
- [ ] Stand placed directly in front of you, centered with your body
- [ ] Top third of the screen at or just below eye level
- [ ] Screen tilted to reduce glare
- [ ] External keyboard and mouse connected and centered
- [ ] Elbows at roughly 90 degrees while typing
- [ ] Feet flat on the floor or footrest
- [ ] Lower back supported
- [ ] Vents unobstructed for airflow
- [ ] Stand tested for stability before placing the laptop on it
Frequently Asked Questions
Do I really need an external keyboard with a laptop stand?
Yes, if you’re using the stand for more than short bursts of work. Without one, you’ll be typing with your wrists in an unnatural, elevated position, which can lead to shoulder and wrist discomfort over time.
How high should I raise my laptop screen?
Aim for the top third of the screen to sit at or just below your natural eye level when you’re sitting upright and looking straight ahead.
Can I use a laptop stand without a desk?
Some portable stands are designed for laps or soft surfaces like couches, but for full ergonomic benefit, a stable desk surface works best.
Will a laptop stand fix neck pain?
It can significantly reduce the strain that causes tech neck, but if you already have existing neck or shoulder pain, it’s worth combining a proper setup with guidance from a physiotherapist or doctor.
Is a laptop stand worth it for occasional use?
Even occasional use — like video calls or a few hours of focused work — benefits from correct screen height, since posture strain builds up quickly during static positions.
Final Thoughts
Using a laptop stand correctly comes down to one core principle: separate your screen height from your typing height. Once you raise the display to eye level and pair it with an external keyboard and mouse, your neck, shoulders, and wrists no longer have to compensate for a design flaw baked into every laptop.
Take a few minutes to run through the setup steps above, adjust the height and angle until it feels natural, and recheck your posture periodically as your workday and seating position change. It’s a small investment of time that pays off in fewer aches, better focus, and a setup that can comfortably support you through long work sessions.

MD.HASAN is an experienced SEO expert and amazon products review writer passionate about helping people find right products on amzon for buy without confusion. With 4 years of hands-on experience in content strategy and search engine optimization, he specializes in writing SEO-friendly blog posts that rank, engage, and convert.