
🔗 Affiliate Disclosure: As an Amazon Associate, Tech Rig Review earns from qualifying purchases. Links on this page may be affiliate links — at no extra cost to you.
Learn how to soundproof a home office on a budget with a proven, room-by-room system — plus the real Amazon products that make each step work.
Between a barking dog, a neighbor’s lawn mower, kids in the next room, or your own voice carrying through a video call, a noisy home office can wreck your focus and your professionalism at the same time. The good news is that real soundproofing — not just a nicer-sounding room, but genuinely less noise getting in or out — doesn’t require ripping out walls or hiring a contractor.
This guide walks through how to soundproof a home office on a budget using a specific, repeatable system: find where sound is actually leaking in, fix those leaks in order of cost and impact, and then address the noise that’s already inside the room. Every product mentioned here has been researched directly on Amazon, with real, current listings — not guessed links or invented specs.
One thing worth setting straight before we start: there’s a real difference between “soundproofing” (blocking sound from entering or leaving a room) and “acoustic treatment” (controlling echo and reflection inside a room you’re already in). Most budget product listings blur this distinction, and it matters for setting realistic expectations. We’ll flag which is which as we go.
Table of Contents
Where Sound Actually Gets Into a Room

Before spending a dollar, it helps to understand how sound travels, because it explains why some fixes work dramatically better than others for the same price.
Sound doesn’t need a big opening to get through — it travels easily through small gaps, thin materials, and anything that vibrates. In a typical home office, that means four consistent weak points show up again and again, regardless of the room’s size or location.
The gap under the door is usually the single largest opening in an otherwise closed room. Even a gap you can barely see lets a surprising amount of sound through, the same way a small gap under a door lets in outside light.
The gaps around the door frame — along both sides and across the top — are smaller individually, but added together they form a second continuous leak path most people never think to check.
Windows, especially older single-pane ones, transmit sound easily because glass is thin, rigid, and vibrates readily with sound waves hitting it from either side.
Thin, hollow interior walls, especially standard drywall-over-stud construction, block mid and high-frequency sound reasonably well but do very little against low-frequency noise like bass, traffic rumble, or a neighbor’s subwoofer.
Once you know where the leaks are, the fix is straightforward: work through them in order, starting with the cheapest and most impactful.
The 5-Step Budget Soundproofing Order
Not all fixes are equal. Some genuinely block sound for a few dollars; others mostly improve the way your room sounds internally, which is valuable but different. Here’s the order that gets you the most real noise reduction per dollar spent.

Let’s go through each step in detail, including the specific products that make each one work.
Step 1: Seal the Gap Under Your Door
This is almost always the highest-impact, lowest-cost fix available, which is exactly why it’s step one. If you can see daylight under your door from inside a lit room, sound is getting through that same gap just as easily.

- 1
- 【NO MORE GAPS】 – 2″ Width x 39″ Length, Fits Gaps up to 1 Inch. Self-adhesive door draft stopper for extra large gaps ex…
- 【SAVE MONEY and ENERGY】- In winter and summer, under door draft Stopperprevent the leakage of air conditioning and heati…
The Suptikes Door Draft Stopper is a self-adhesive door sweep that runs the width of a standard door and presses directly onto the bottom edge, closing that gap without any drilling or hardware installation. It’s designed for both interior and exterior doors, and beyond the noise benefit, it also blocks light and drafts, which is a nice bonus if your home office also runs a bit cold or bright under the door.

Installation is genuinely simple: clean the bottom edge of the door, measure and trim the sweep to width if needed, peel the adhesive backing, and press it into place. No special tools required, and most people can finish this step in under ten minutes.
Step 2: Seal the Gaps Around the Door Frame
With the bottom of the door handled, the next leak path is the thin gap running along both sides of the door and across the top, where the door meets its frame.

- Foam Seal Tape
- 2 ROLLS EXQUISITE PACK-This foam weather seal includes 1 inch W x 1/8 inch T x 16.5 ft x 2 rolls. Three black weather st…
- STRONG ADHESIVE FOAM TAPE-We use upgraded strong adhesives on every door foam seal strip. Don’t worried about degumming …
The MAGZO Weather Stripping Door Seal is a self-adhesive foam tape designed specifically for this kind of gap, sold in two rolls totaling 33 feet — enough to fully seal a standard door frame with material left over for a second door or a window. The foam compresses slightly when the door closes against it, creating a soft seal along the entire perimeter rather than just at the bottom.
This step matters more than it might seem, because a door that’s perfectly sealed at the bottom but still gapped around the sides and top has simply moved the leak rather than closed it. Doing steps one and two together is what actually turns your door into a real barrier instead of a partial one.
Step 3: Layer Your Windows With Heavy Curtains
If your home office has a window, it’s very likely your third-largest source of sound leakage, right behind the door bottom and door frame. Standard curtains are built for light and privacy, not sound, so a lightweight curtain over a window does very little for noise even though it looks like a fix.

- 100% Polyester
- Imported
- ELEGANT DESIGN: A panel BLACKOUT CURTAIN per package. Each Curtain Panel measures 42″ wide x 84″ long. The NICETOWN drap…
The NICETOWN Soundproof Thermal Insulated Blackout Curtain uses a heavier, densely woven fabric with a black lining specifically intended to add mass over the glass, which is the actual mechanism that reduces sound transmission through a window — mass and density, not just fabric thickness. According to the manufacturer’s own product description, the layered construction is rated to absorb meaningfully more sound than a standard single-layer curtain, though as with any curtain-based fix, it works best on windows that are already reasonably well-sealed around the frame, not as a stand-alone fix for a drafty, gapped window.
For the best result, hang the curtain wide enough to extend a few inches past each side of the window frame and close enough to the wall that there’s minimal gap for sound to slip around the edges — the same “seal the perimeter” principle that applies to the door.
Step 4: Add Acoustic Foam Panels to Control Echo
This is the step where it’s important to reset expectations. Acoustic foam panels are genuinely useful, but they solve a different problem than the first three steps. Foam panels absorb sound reflecting around inside your room, which reduces echo and makes your voice sound clearer on calls and recordings — but they do very little to block outside noise from entering the room in the first place, since foam is lightweight and porous rather than dense.

- 【Ultimate Audio Clarity Enhancer】 Crafted from advanced 30kg/m³ high-density polyurethane foam, JBER acoustic wall panel…
- 【Sustainable Design】 Our acoustic foam panels stand the test of time, crafted from echo-friendly materials that are not …
- 【Superior Performance】 Equipped with flame-retardant properties, backed by recognized fire-safety certifications from pr…
The JBER 12-Pack Acoustic Foam Panels are 1-inch-thick wedge-style foam tiles designed for exactly this purpose: reducing reverberation and improving how a room sounds for calls, recording, or just working without a distracting echo. They’re a genuinely budget-friendly way to noticeably improve your room’s internal acoustics, which matters a lot if you’re on video calls regularly and people mention your audio sounding “boxy” or “echoey.”
Placement matters more than quantity with foam panels. Rather than covering every wall, the most effective approach targets specific spots called first reflection points — the exact places on your side walls and ceiling where sound from your speakers (or your voice bouncing back) first hits a hard surface before reaching your ears.

A simple way to find these points without any special equipment: sit in your normal chair position, and have someone slide a small mirror along the side wall while you stay seated. Wherever you can see your speaker (or monitor) reflected in the mirror from your seated position is a first reflection point — and that’s exactly where a foam panel does the most good.
Step 5: Add a Rug Pad to Absorb Floor Noise
The floor is easy to overlook, but hard flooring — laminate, tile, or hardwood — reflects sound just as readily as a bare wall, and footsteps or chair movement can also transmit noise to rooms below.
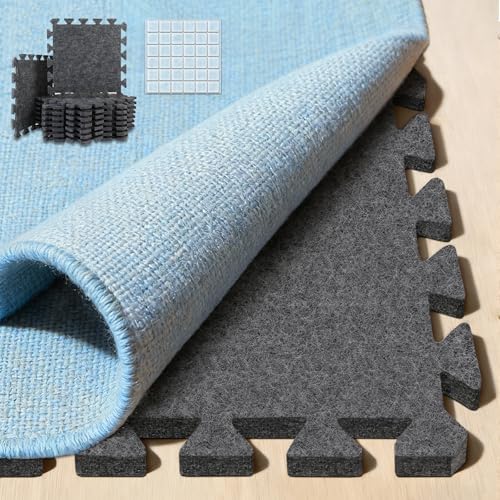
- 【SPECIFICATION】: Dimensions: 11” x 11” x 0.4”, pack of 16; Material: 100% polyester fiber felt; Density: 150kg/m3; Ar…
- 【GUARD FLOOR RUG & NON SLIP】: Unique interlocking structure keeps the pads together, helping your rugs stay in place and…
- 【SOUND ABSORBING & VIBRATION ISOLATION】: The thick and durable felt carpet pad provides ample cushioning, giving your fe…
The BXI Soundproof Interlocking Rug Pad uses dense felt tiles that interlock like puzzle pieces, making it easy to size to your specific floor area without needing to buy a full custom rug. Beyond cushioning your feet, the felt material absorbs some of the impact noise from footsteps and chair casters, which particularly helps if you’re on an upper floor and have ever gotten a message from someone downstairs about hearing you pace during calls.
Like the foam panels in Step 4, this is primarily an internal acoustic fix rather than a way to block outside noise — but it’s a genuinely useful complement to the first three steps, especially in a room with a lot of hard, reflective flooring.
Putting It All Together: Priority and Budget
Here’s how the five fixes stack up against each other, so you can decide where to start if you’re working with a tight budget and can’t do everything at once.

The general pattern holds across almost any room: the door is doing the most damage, and it’s also the cheapest thing to fix. If your budget only covers one or two items right now, start with the door sweep and door frame weatherstripping — together they typically cost less than a single acoustic foam panel pack, and they address actual sound leakage rather than internal room acoustics.
A Few Realistic Expectations
It’s worth being direct about what budget soundproofing can and can’t do, since a lot of product marketing in this space overstates the results.
You will not achieve studio-level isolation with any of the products above. True soundproofing at that level involves decoupled wall construction, mass-loaded vinyl barriers, and sometimes entirely separate inner walls — expensive, invasive work that goes well beyond a budget home office fix. What you can realistically expect from the steps above is a noticeably quieter room: less bleed-through from a door gap, less echo on calls, and less distraction from everyday household noise.
Sealing gaps has a ceiling. Once a door and its frame are fully sealed, most of what’s left getting through is transmitted through the door material itself and the surrounding wall, which foam tape and a curtain can’t address. If you’ve done all five steps and still have a persistent noise problem, especially from a shared wall, that’s usually a sign you’re dealing with structural sound transmission that requires a different, more involved approach.
Consistency matters more than any single product. A perfectly sealed door with an unsealed window will still leak plenty of noise, since sound takes the path of least resistance. Working through all five steps, even with a modest product on each one, tends to outperform doing one step perfectly and skipping the rest.
For more technical background on how sound transmission and acoustic ratings actually work, the Acoustical Society of America’s public resources explain the science in accessible terms, and the U.S. Department of Energy’s guide to sealing air leaks — while written for energy efficiency — covers the same gap-sealing principles that apply directly to sound leakage, since air leaks and sound leaks travel through the same openings. If you’re specifically dealing with recording or podcast-quality audio rather than just a quieter workspace, the National Association of Broadcasters’ acoustic treatment primers are a useful next step beyond general home office noise control.
Frequently Asked Questions
What’s the difference between soundproofing and acoustic treatment?
Soundproofing blocks sound from entering or leaving a room — sealing gaps, adding mass to windows and doors, and closing off leak paths. Acoustic treatment, like foam panels and rug pads, controls how sound behaves inside a room you’re already in, reducing echo and reflection. Both matter, but they solve different problems, and a lot of budget products marketed as “soundproofing” are actually acoustic treatment.
Can egg cartons or foam mattress toppers work as a cheap alternative to acoustic foam panels?
Not effectively. This is a persistent myth — egg cartons and mattress foam aren’t designed with the density or cell structure that actual acoustic foam uses, and they don’t meaningfully absorb sound compared to purpose-built panels. If budget is the main concern, a modest pack of real acoustic foam panels will outperform improvised alternatives by a wide margin.
Will sealing my door and windows make my home office too stuffy?
A well-sealed door and windows reduce air leakage along with sound leakage, but a home office isn’t airtight even after these fixes — normal room ventilation through the rest of the house, or opening a window periodically, is usually enough. If you’re concerned about airflow, it’s worth cracking the door or window occasionally rather than leaving the room permanently sealed.
How much noise reduction can I realistically expect from these budget fixes?
It varies significantly by room and noise source, since sealing gaps has the biggest impact on airborne noise like voices and general household sound, while it does less for structural or bass-heavy noise transmitted through walls and floors. Most people notice a clear, real difference after sealing the door and adding curtains, even without any lab-measured decibel figure to point to.
Do I need to soundproof all four weak points, or just the door?
The door is almost always the highest-priority fix, but a room with an unsealed window or thin walls will still let in plenty of noise even with a perfectly sealed door. If your budget only allows for one or two steps right now, start with the door, but plan to work through the rest over time for the best overall result.
Is acoustic foam actually necessary if I just want a quieter room, not better audio for calls?
If your main goal is blocking outside noise rather than improving how your own voice or recordings sound, acoustic foam is the lowest priority of the five steps here. It’s most valuable if you’re regularly on video calls or recording audio and want to reduce echo, rather than purely trying to keep outside noise from getting in.
Can renters do any of this without violating a lease?
Most of the products covered here are specifically designed to be renter-friendly — adhesive-backed door sweeps, foam weatherstripping tape, curtains on a standard rod, and interlocking rug tiles all avoid drilling or permanent modification, and can typically be removed without damage. It’s still worth checking your specific lease terms, especially around adhesive products, before installing anything.
What should I do if these budget fixes aren’t enough?
If you’ve worked through all five steps and noise is still a significant problem, that’s usually a sign the issue is structural — sound transmitting through walls, floors, or ceilings themselves rather than through gaps and thin materials. At that point, options like mass-loaded vinyl barriers, dedicated soundproof drywall, or professional acoustic consultation become worth considering, though those solutions go well beyond a typical budget home office project.
Final Thoughts
Soundproofing a home office on a budget comes down to understanding where sound actually gets in, and fixing those leaks in the right order. Sealing your door — both the bottom gap and the frame — will do more for a typical home office than any other single step, and it costs less than almost anything else on this list. Layering in heavier curtains, targeted foam panels, and a floor rug pad rounds out the system, addressing both the sound trying to get in and the echo already bouncing around once you’re inside.
None of these fixes require permanent changes to your home, and all five can be installed in an afternoon without professional help. Start with the door, work outward, and a genuinely quieter home office is well within reach without a major renovation budget.
As an Amazon Associate, I earn from qualifying purchases.

MD.HASAN is an experienced SEO expert and amazon products review writer passionate about helping people find right products on amzon for buy without confusion. With 4 years of hands-on experience in content strategy and search engine optimization, he specializes in writing SEO-friendly blog posts that rank, engage, and convert.